Friday, July 20, 2012

Whole Wheat Sourdough Potato Bread

As you've probably noticed, I like playing around with sourdough bread recipes. While I love my Super Simple Sourdough Bread, it tends to be a little too sour for my kids' taste, and a little dense for my husband's. So I've reverted back to an old favorite, sourdough potato bread. It's not quite as simple, and a little less healthy, but it doesn't taste so sour and rises beautifully (sometimes too much! I just had a loaf overflow onto the bottom of the oven because I left the dough a little too wet). It's a great sandwich loaf for the whole family.

Whole Wheat Sourdough Potato Bread
Sponge:
1/2 cup sourdough starter
3/4 cup water
1 cup freshly ground whole wheat flour (NOT sprouted!)
1/2 cup plain mashed potatoes (no butter or salt)

Mix these ingredients together in a large bowl, cover loosely, and let rise overnight. This will rise a LOT so make sure your bowl is at least twice as big as your sponge.

In the morning, stir down the sponge and add:
1/3 cup warm water
1 tsp salt
1/4 cup oil, lard, melted butter, or liquid coconut oil
2 Tbsp honey
3 cups whole wheat flour (NOT sprouted!)

Mix all well (I do this in my Kitchen Aid mixer). Add more flour if needed to prevent stickiness. Dough should be soft and firm yet pliable. Cover and let rise until doubled, about 2 hours.

Punch down and place into loaf pan; cover loosely and let rise again.

Bake in a preheated oven at 375 degrees for 45 minutes. Remove from pan and cool on a wire rack. If you prefer a softer crust, cover until completely cooled.

Wednesday, July 18, 2012

Zucchini Chocolate Chip Cookies

These aren't exactly healthy (except for the fact that they have a vegetable in them), but they're so soft and delicious I make them anyway (you know, for a special occasion . . . like when I finally get around to weeding my garden and find a bunch of volunteer squash . . .)

Zucchini Chocolate Chip Cookies
1/2 cup (1 stick) softened butter or coconut oil
1 cup sugar (I use sucanat)
1 egg
2 cups flour (whole wheat works fine - I like to use sprouted)
1 tsp baking soda
1 tsp cinnamon
1/2 tsp salt
1 cup grated zucchini (or carrots work, too)
1 cup chocolate chips (I use the Ghiradelli 60% cocoa chips - yum!)
Mix all together, drop by teaspoonfuls onto greased cookie sheet. Bake at 350 degrees for 15 to 20 minutes. Do not overbake.

Probiotic Dill Pickles

Note to self:
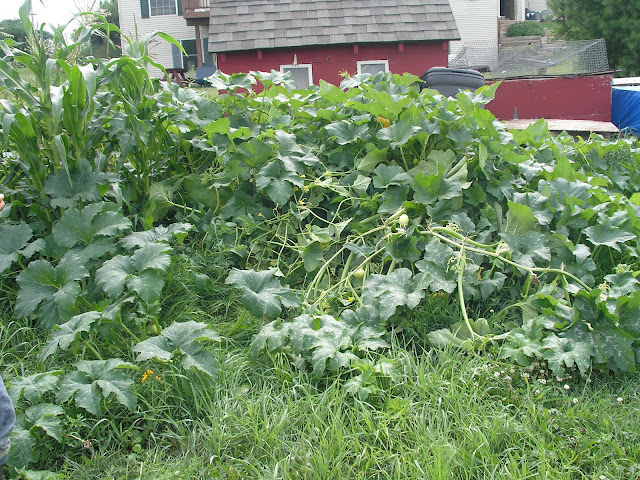
No matter how much you love pumpkins, do not let a volunteer pumpkin grow next to your cucumber bed.

I planted my cucumbers way out back behind the chicken coop (the chickens are out in their pasture pens, so they're not close enough to destroy any vegetables, but it's very well-fertilized from their *ahem* deposits all last winter). Since I can't see the plants easily, I kind of forgot about them. When I went out to check on them this afternoon, this is what I found. See any cucumbers in there???

Well, after wading through the pumpkin vines, I did find some cucumber plants, and even a few veggies ready to pick. But I also realized that something needed to be done. I carefully pruned away most of the pumpkin vines (realizing halfway through that the bulk of them were not actually pumpkin vines, but a volunteer patty pan squash or two. This was a relief, since I don't particularly care for pattypan squash, and felt much better about ripping those out than my precious pumpkins! There were a few ripe squash of harvestable size, so I saved those and shredded them later for making into zucchini chocolate chip cookies.)

A half hour later, I had removed most of the intruding vines (except one pumpkin plant I just couldn't bring myself to pull - it had four big Cinderella-style pumpkins already growing on it, and since I didn't have any other plants with that shape of pumpkin on them, I gave in and let them stay - did I mention I'm a sap when it comes to pumpkins?) The cucumber plants were long and straggly, so instead of trying to train them up the tomato cages, as I'd originally intended, I laid them down on top of some old cardboard boxes - hopefully this will make it easier to find the ripe cukes, and keep them from rotting in the wet grass.

(Can you see that adorable pumpkin on the right edge of the picture? How could I pull that cute thing out???)

*ahem*

With the eight or so pickling-sized cukes I found under that jungle of vines, I decided to make our family's favorite dill pickles (recipe adapted from Nourishing Traditions - I changed up the spices a bit, so they taste more like what my family's used to; similar to the Vlasic dill pickles we used to buy).

Lacto-Fermented Dill Pickles
for each pint, place:
one head of dill
one clove of garlic
enough cucumbers to fill jar
1 Tablespoon of salt (sea salt works fine)
Cover with water (you can add some whey for a little kick-start), leaving an inch of headspace (this will bubble up as it ferments). Place a lid on the jar and leave at room temperature for 3 days, "burping" the jar regularly to release pressure. After three days, move the jars to a refrigerator or cool cellar for long-term storage.

I love this recipe because not only are they good for you, but you don't have to can them! I appreciate any excuse not to have to heat up the house in July and August. It's also nice that you can just make a jar now and again as you have cukes - you don't have worry about making a full canner load.

This post is part of Real Food Wednesday.

Tuesday, July 17, 2012

The New Girls

For my daughter's tenth birthday, we gave her 5 bantam hens (purchased from a local chicken keeper). I've been thinking of getting some banty hens for a while now, since they have a reputation for being frequently broody and great mothers (I've tried to hatch eggs in an incubator three times now, with no success). We really want to be more self-sufficient as far as the chickens are concerned (it really burns me that we feed a rooster all year so we have fertile eggs, but haven't been able to hatch any chicks!) The woman we bought them from said they've all set chicks for her, so we have high hopes for some cheeping babies from our own chickens sometime soon!

Without further ado, here are some pictures of our new girls:

(Sorry about the "blue screen" effect on the pictures; it was a hot day today, and they wanted to stay under the tarp and out of the sun!)

Millie the mille fleur


Minnie the game hen (Minnie is for "miniature" - they're all small, but she's tiny!)


Nellie is a cochin/silkie cross (she looks pretty chubby, but she's all feathers!)


Marsha (short for "Marshmallow") - another cochin


And, last but not least (my favorite!) - Mrs. Blewett (another cochin)


Welcome to the farm, ladies!

Saturday, July 7, 2012

Hanging Chicken Feeders

I like my chicken feeders - they're cheap to make, work well, and are easy to use. The one drawback was that, since I set them on the ground, the chickens would often knock them over and spill their feed. Worse yet, they would also more often than not knock them over onto their waterer, which would tip it enough to make all of the water slowly drain out.

So I headed to the hardware store to get some more U-bolts and S-hooks, thinking I would hang them the same way I had hung the waterers. Scanning the aisles for the S-hooks, however, I saw these bicycle hooks, and the lightbulb went on:


They work perfectly - the feeder hangs off the ground, so the birds can't tip them over, and the hooks screw directly into the frame; no extra hardware needed. I've been using them for almost a month now, with no problems. What a simple solution!

Well, What Do You Know?

Just for comparison, I made two batches of bread dough yesterday - one with my normal whole wheat sourdough recipe, the other substituting unbleached white flour (but still using the whole wheat sourdough starter). I wanted to see just how much higher the white flour loaf would rise, in the interest of finding out if it would be worthwhile switching to white flour for my sourdough loaves (they can be pretty dense).

But lo and behold, four hours after I mixed both batches of dough and set them out to rise, here's what I found:
As you can see, the darker loaf, on the right, rose better than the loaf with white flour on the left! What a pleasant surprise! I guess I'll stick with the whole wheat after all!