Thursday, May 9, 2019

Home Smoked Bacon

Homemade Bacon Recipe
I was really wracking my brain to think of an exiting title, but really, what's more exiting than that? Bacon is the product of a kind of miraculous alchemy, a blending of meat, salt, and smoke to make one of the top five most spectacular foods ever created. Knowing how to work that spell and make this magic at home (so you know exactly what is (or isn't) going into your bacon) is one of the greatest homesteading skills you can achieve!

I first heard of this recipe from a class I took at the Hay River Traditional & Green Skills 2018 event. The class was called Makin' Bacon! Home Smoking Basics, taught by Brett Laidlaw, a blogger and author with a cabin in northwestern Wisconsin, less than an hour from where I live (here's a link to his blog, which I encourage you to check out: troutcaviar.blogspot.com)

In his class, he showed us how to choose, cure, and smoke bacon in a cheap backyard grill. The best part? He gave out free samples of the finished product, so we could know if we liked it before we went to the trouble of making it for ourselves at home. Smart guy!

Here's the recipe, straight out of his book, Trout Caviar: Recipes from a Northern Forager:

Home-Smoked Bacon

2 pounds pork belly
1/4 cup maple syrup or brown sugar
3 Tablespoons salt (I use canning/pickling salt because of the finer texture)

Rub the pork belly with the maple syrup, sprinkle salt on all sides, and let cure, covered, in the refrigerator for 24 hours, turning occasionally. For a brown sugar cure, mix the sugar and salt and pat it evenly on all sides of the meat. 

The next day, rinse off excess salt, pat dry, and smoke at 200-220 degrees for 2-3 hours. The bacon will be both smoked and fully cooked. If you are unsure about whether the bacon is cooked at this point, set your mind at ease by placing it in a 200 degree oven for 30 minutes. A meat thermometer inserted into the bacon should read 160 degrees. 

Be sure to sample a small slice of he still-warm bacon straight from the smoker and sweating fragrant fat. You'll see that it's more than worth the small trouble of smoking your own.

See how easy that is? Only three ingredients, and if you use an electric smoker with a temperature probe (here's a link to the one I have), it takes all the guesswork out of it. I just rinse the marinaded meat, pat it dry, and set it on the rack. Insert the probe, shut the door, push a few buttons, and a few hours later - pork perfection.

If you don't have a smoker, he details in his book how to smoke your meat on a regular backyard grill. It's more putzy than an electric smoker, but you can still get the same amazing result.

Either way, it's suprisingly simple, and the results are well worth the effort (I heartily second his recommendation of sampling while it's still warm - and perhaps licking the pan . . .) Make sure to save any drippings; these are great for greasing the pan when frying eggs, etc.


Please note - the links above are affiliate links. If you make a purchase after clicking I will receive a small commission, but your price remains the same. Thank you for your support!

Saturday, May 4, 2019

Spring Planting Signs

When to Plant
Everyone knows that farming is dependent on the weather. Where I live, in hardiness zone 4b, we have short summers and long winters, so we really need to maximize our growing season. We want to get our plants in as early as possible; but how do we know when the ground is ready to plant? Too early, and our transplants won't survive and seeds will just rot. Here in Northwestern Wisconsin, frost-out can vary by weeks from year to year - it seems like sometimes the ground thaws out in March, and other times not until mid-April. So how do you know when it's safe to plant?

If you've read Laura Ingalls Wilder's classic book Farmer Boy, you may remember the scene where Almanzo and Alice are arguing about planting time:
At the end of the row he looked at the ash tree’s crumpled new leaves, and asked Alice if she knew when to plant corn. She didn’t, so he told her. Corn-planting time is when the ash leaves are as big as squirrel’s ears.
“How big a squirrel?” Alice asked.
“Just an ordinary squirrel.”
“Well, those leaves are as big as a baby squirrel’s ears. And it isn’t corn-planting time.”
For a minute Almanzo didn’t know what to think. Then he said:
“A baby squirrel isn’t a squirrel; it’s a kitten.”
“But it’s just as much a squirrel—”
“No it isn’t. It’s a kitten. Little cats are kittens, and little foxes are kittens, and little squirrels are kittens. A kitten isn’t a cat, and a kitten isn’t a squirrel, either.”
“Oh,” Alice said.
Squirrels and kittens aside, there are many signs from nature that give us hints at what's going on below ground. One rule of thumb I've heard is that if the weeds are coming up, cold-hardy plants like spinach, lettuce, and broccoli should be able to grow, too. Makes sense, don't you think? If it's warm enough for the "wild" plants to germinate, our cultivated plants should be able to, too.

A more specific tip I've read is that you should plant potatoes, beets, carrots, and peas when the dandelions start blooming. Now, I have dandelions growing right up next to my house that are about to flower, but I'm not going by that, since they're benefiting from the warmth coming off of the foundation - a very different microclimate than down in my garden. I need to look at the dandelions growing around my garden to see when that soil is ready.

Another tip I've heard is that when crocus flowers start blooming, you can plant peas, lettuce, spinach, cabbage, and broccoli. Or, if you don't have crocus flowers, you can plant these when the lilacs show their first leaves, or when the daffodils begin to bloom. In our neck of the woods, the daffodils are just sending up their first leaves right now, the lilac leaves aren't out yet, and unfortunately I don't have any crocus flowers planted on our new property. So it looks like I have a little time to wait before I should start planting - which I should note for next year, since the broccoli and Brussels sprouts I started indoors are more than ready to be transplanted! Ah, well. I'll know to start my seeds a little later next spring.

For the more tender vegetables like corn and beans, the old-timers said that you can plant these when oak leaves are the size of a mouse's ear - or, if you're more the Alice type, and want to be contentious about what size mouse, you can wait until the apple blossoms start to fall. Another sign is when the daylillies bloom; that's when you'll want to put out your tomatoes and peppers. And when the lilac flowers start to fade, then you can plant your cucumbers and squash.

In our modern, over-scheduled world, this seems very imprecise and hard to plan. I want to know when to start my seedlings indoors so they'll be at the perfect size when planting time comes! But any farmer will tell you, the real world doesn't necessarily run on your schedule. Some years spring will warm up early, other years you'll get snow the first week of June (my dad has a photo of snow on our lilac bush from a freak June snowstorm when I was a teenager). But knowing what signs to look for can help you know when your part of the world is ready to start growing again.

Thursday, May 2, 2019

Taking My Piggies to the Bank

Home Raised Pigs
So how much did it actually cost me to raise my pigs last summer? To me, it was worth every penny to know exactly how my pigs were raised and what they ate (actually, I think I saw Hickory chewing on a golf ball once - but I was not about to reach around those teeth to try to get it out! I just let that one pass. Literally . . .) As much as I try to find good food, unless you're buying from someone you know or raising it yourself, you just don't know. And I want to know.

But I still have to try to be practical about it. We need to be good stewards of the resources God's given us, and money is one of those resources, just like the land and animals we're here to care for. So here's how our numbers from 2018 broke down:

Purchase price: $50 each; $100 total
Feed: $.4975 per pound; 2,123 pounds; $1056.28 total
Processing equipment: $296.20
Total cost: $1452.48
Weight of meat (added up after butchering; does not include lard and bones): 300 pounds
Price per pound: $4.84

Oof! That feels like a lot. But then I compare it to how much I'd pay for the cuts of meat we actually eat:
(Prices are all per pound)
Organic Pork Chops: $6.21
Conventional Pork Tenderloin (I couldn't even find organic): $10.94
Organic Nitrate Free Bacon: $15.00
Organic Ham: $11.50
Brats (from Louie's - our favorite local meat shop; not organic): $4.79

And of course that cost included purchasing the processing equipment (which turned out to be less than what we'd payed for processing in the past, but still an expense we needed to account for). Without that extra cost, our price would have been $3.85 per pound. I still have to do my own smoking for the bacon and hams, but I actually prefer that, since I have control over what goes into them.

I do wish we'd been able to butcher them on schedule (click here to read all about why we didn't); that would have saved us almost 300 pounds of feed per pig - and judging by previous years' totals, it wouldn't have reduced their weight by very much, so we could have saved another $300 right there.

So, if all goes well next year, based on my last three year's numbers, I can expect to buy around 750 pounds of feed per hog. If the price of feed holds steady and I can still get piglets for around $50 a piece, that should put my average price around $850 for two pigs. I expect to get about 300 pounds of meat out of them in that amount of time, so that would put my price at under $3 a pound - for organic pastured pork. You're not going to find that anywhere!

All in all, I'm very happy with how those numbers work out. As I said, I think raising our own meat is worth it no matter what the price, but seeing the actual amount I'm saving makes it that much more satisfying.

Wednesday, May 1, 2019

These Little Piggies Didn't Go to Market

Bacon Seeds
Tomorrow we flip the calendar to May first - which around here means it's time to call our local pig farmer and see if he has some weaners for sale (meaning weaned piglets, not hot dogs). 😉 I had hoped to keep you updated on our three little pigs in 2017, but with selling our old house, hunting for our new one, packing, unpacking, and still homeschooling and making three meals a day (mostly) from scratch, my poor little blog got neglected. As far as I can remember, everything went smoothly, and we enjoyed our home-raised ham and bacon.

Fast forward to spring of 2018, as we were still settling into our new house and eagerly watching the snow melt and reveal new suprises on the property (including an apple tree hidden in the woods!) We brought the chickens home, transplanted some blueberry, raspberry, elderberry, and hazelnut bushes from our old house, and even managed to plant a few tomatoes.

Things were looking more and more like a homestead, so much so that in June I decided we could probably even manage to raise a couple of pigs. We almost couldn't find any because it was so late in the year already, but the farmer we'd bought from the year before had a cancellation, and so we we were able to bring home our girls - Maple and Hickory (a hint to my husband that I was hoping to get a smoker for my birthday in the fall). 😉

The summer progressed and the pigs grew just like they were supposed to. Since we'd gotten them late, we would have them longer into the fall, and I was excited to see if we could take a cut out of their feed costs by feeding them products from our new property. One of the first things we used was acorns from the oak trees in our woods. The apple tree we'd found in the spring also bore abundantly that fall, and anything the kids wouldn't eat went to the pigs.

We were very blessed to have friends who were willing to share their bounty with us that summer - at least four ladies called us up and asked if we could use apples from their trees, and were delighted when we volunteered to gather the wormy windfalls to fatten up the pigs. The chickens were delighted, too, to clean up what the pigs left behind - we gleaned so many that our porkers couldn't even eat them all! 
Backyard pork
We weren't able to have much of a garden that first year on the new land, but I did manage to squeeze in a butternut squash plant and some cucumbers near the tomatoes. The squash did amazing - we harvested everything that was ripe before the fall frost, and everything that didn't have time to ripen we cooked up and fed to the pigs. And of course if I found an over-ripe cucumber or a tomato too blemished for us to eat, I'd lob it straight into their pen.

A month before our planned processing date, I called the butcher shop, only to find that instead of processing my pigs in early October, as I'd planned, they were booked until early November and wouldn't be able to pick up my pigs until then. I cringed at the thought of feeding two full-grown pigs for an extra month (at that age they're eating a LOT of feed - that extra month would end up costing me over $300), but what could I do?

Then, when butchering day finally did arrive, I was shocked to get a call from the butcher asking when we would be bringing our pigs in. I had specifically asked for on-farm slaughter, since I had no way of transporting them. I explained this, in desperate tones, to the butcher, and he told me he'd see when he could get me on the schedule and give me a call back. 

He didn't call back. 

I called him, daily, and he kept putting me off, while I got more and more desperate.

Meanwhile, friends of ours, who'd purchased their pigs at the same time we'd gotten ours, were planning a butchering party. A member of their church was a retired butcher, and had agreed to show them (and any interested friends, like me) how it was done. I jumped at the chance, and the kids and I spent two days learning just what it took to process a hog.

At that time, we still held out hope that the butcher would pull through for us - my husband really wanted to avoid the stress and mess and just hire out the job. But after the butcher put us off twice more, he finally gave in and said we were going to have to do it ourselves (before we went broke from buying pig feed!)

We headed over to our local Farm & Fleet store and bought what supplies we thought we needed - a pair of gambrels, tow straps, a clean reciprocating saw blade to halve the carcasses, and the smoker I'd been hoping for (a couple of weeks late for my birthday, but I was OK with that!) I was pleased to see that the cost of the supplies added up to less than what we would have paid for processing, so at least we weren't getting any farther behind as far as money was concerned. But we still had a big job ahead of us, and with each purchase the fact became more and more real - we really were going to do this!

Hearing the anxiety in my voice as I told my friends about our decision, they volunteered to help us out. My 18-year old son and his buddy did the actual killing and gutting (his friend's deer hunting experience was very helpful for this), his mother, sister, and my girls helped with the skinning and cleaning, and I got to be manager and facilitator (that's a fancy way of saying go-fer) 😉 for the operation. 
Backyard Pig Processing
My daughters helping out with removing the hide
We left the carcasses to hang overnight (shooing our kitten out of his normal spot in the garage and locking him in the workshop) and finished processing the cuts the next day. Another friend came to help me with wrapping the cuts in the kitchen, while the rest of the crew did the cutting up outside. The only major hitch they ran into was cutting up the pork chops - we didn't feel like we could do the job safely with either the handsaw I'd bought nor our reciprocating saw, so the chops went into the freezer unchopped, in one big chunk (where they're still waiting to be cut up, almost six months later . . .)

When all was said and done, after two long, anxious days of hard work, we had 300 pounds of organic pork safely stored in our freezers. It was a big job, and one I definitely wouldn't want to do every day, but all in all it went much better than I'd feared, thanks to the help and support of my husband (who financed the whole operation), our kids, and our wonderful friends. 


Please note - the links above are affiliate links. If you make a purchase after clicking I will receive a small commission, but your price remains the same. Thank you for your support!

Thursday, April 25, 2019

2019 Maple Syrup Recap

Last Tuesday I made the decision to pull the taps on my maple trees, which officially ended the maple syrup making season for me - and hopefully explains why my husband found me standing next to the sap-boiling fire belting out Europe's "It's the Final Countdown!" repeatedly throughout Wednesday afternoon. 😄

By all accounts, it was a good year for syrup - the "sugar snow" that fell on the 11th really got the sap moving and lengthened the sap run (one of the only silver linings to be found on an April blizzard). A friend of ours who bottles commercially says they boiled down 120 gallons of sap this year, when their previous year's total was closer to 80; definitely a significant increase!

Obviously I'm not syruping on that scale, but as I mentioned in a previous post, I surpassed my "break-even" goal of 3 gallons, so I'm happy. Our final total is a little hard to add up, since I gave a quart to my parents (apparently you never grow out of saying, "Mommy, look what I made!"), we had family pancake breakfasts twice (5 kids can go through a lot of syrup!), and two Friday "Brownie and Ice Cream Nights" (their Daddy can eat his fair share, too!) 😉

But when all is said and done, we have 3 1/2 gallons of pure maple goodness sitting on the pantry shelf, which is about what we'd usually buy from a local producer each spring for our year's supply - and all from just 16 trees on our little farmstead. Not a bad return for a few afternoons' "work" sitting around the campfire!


You can read more of my maple syrup making adventures here, here, and here.

Friday, April 19, 2019

The Best Laid Plans . . .

In Literature class recently the kids and I were reading poems by Robert Burns, and one of the selections was "To a Mouse." While the kids loved his description of the "wee, sleekit, cowran, tim'rous beastie" (and laughed at my terrible Scottish accent while I read to them), I was sighing in commiseration with the line, "The best laid schemes o' mice an' men/Gang aft agley,/An' lea'e us nought but grief an' pain,/For promis'd joy!"

It seems that all my careful planning back in January might turn out to be a bigger mess than that mouse's nest. April 15th was suppsed to be my first round of putting transplants out in the garden, but this is what the broccoli bed looked like yesterday afternoon:
garden bed layout
Obviously, the ground is not warm enough to plant in - even for a cool-weather tolerant plant like broccoli. And the beds, though well mulched with leaves over the winter, need a little TLC before they're ready for the summer.

The other problem was that the garden I laid out on paper, with carefully spaced gridlines and exact spacing for each plant, didn't exactly line up with the more organic reality outside. For example, here's a picture of my asparagus bed (with a wire tunnel over it to keep the chickens out of it) and the wood-bordered raised garlic bed next to it (there's fence wire on top of the garlic bed - also to keep the chickens from digging - and the logs on top of the bed are to keep the fencing down)
early spring garden design
The strings show where my carefully planned gridlines say my beds and paths should be - unfortunately, that puts a path straight through my garlic plants, and the asparagus row is completely katywampus to where the strings say it really ought to be.

So there was a little re-thinking to be done. Thankfully, I had plenty of time to stand around and contemplate garden layouts while I was boiling down my last batch of maple syrup, and I think I've figured out a way to make it work. Instead of four three-foot garden beds in the middle of the garden, with two-foot beds along the fences, I have three beds in the center of the original size with a two-foot bed on either side, plus the original fence-edged beds. So I actually ended up with an extra, smaller bed and one slightly shrunken bed - even better than my original plan!

We'll see how this plan holds up to reality as the summer unfolds . . .

Wednesday, April 17, 2019

Basic Buttermilk Pancakes

buttermilk pancakes from scratch
With all of the maple syrup making going on, of course the kids have been begging for pancakes. And of course, being a loving mom (and geeking out about the awesomeness of making homemade maple syrup), I've given in and made them once or twice in the last couple weeks. For just a simple, basic pancake to smother in maple syrup, this is my favorite. They're super simple to whip up, they come out light and fluffy, and my kids love them.

Basic Buttermilk Pancakes
1 1/4 cups flour (sprouted whole wheat is my go-to - here's how you make it)
1 tsp baking soda
1/2 tsp salt
2 Tbsp butter, melted
1 1/4 cups buttermilk (regular milk works fine, too - just add 1/2 tsp cream of tartar to activate the baking soda)
1 egg, beaten
1/2 tsp sweetener of choice (honey, sugar, or maple syrup all work great)
Mix dry ingredients, then add liquid ingredients. Fry as desired.

Thursday, April 11, 2019

Is Maple Sap Tea the New Organic Gatorade (TM)?

Maple Sap Tea
I was chatting with a friend at church on Sunday, and she mentioned that her family's been drinking the sap from their maple trees (they only boil it long enough to kill any bacteria that may have accumulated while the bag was hanging on the tree, not anywhere near long enough to make syrup). Apparently this is a thing - a quick google search later that afternoon pulled up articles from Men's Journal, NPR, and Medical Daily, as well as more wild-food oriented sites like Chelsea Green and Wild Foodism. There are even a few companies that sell maple sap commercially. My friend said her family loves it - "It's full of electrolytes, just like a natural Gatorade(TM)!" She was even thinking about freezing pints of it for the summer, when her husband (who has a very physical outdoor job) will need the nutrients while working in the hot sun.

I thought that was a great idea, and then had an idea of my own - why not add a tea bag when you're flash-boiling a little sap to drink and have a naturally sweetened herbal tea?

I had to try it - and I was very pleasantly surprised. I was worried it wouldn't be sweet enough for my taste, but I tried it with some Rose Hips and Hibiscus tea from Traditional Medicinals, and my cup had just the right level of sweetness. It's also great with my evening cup of Nighty Night tea. I will definitely be making my tea this way whenever I have extra maple sap (but unfortunately I don't think I can spare the freezer space to save some for summertime - I guess it will just have to be a seasonal treat!)

Friday, April 5, 2019

Maple Syrup Making Tips

backyard maple syrup tips
Today we boiled down our fourth batch of maple syrup, bringing our finished syrup total over three gallons - which means we've officially "paid off" my investment (meaning I've produced enough syrup, in terms of dollars, to offset the money I paid for the equipment. So the rest of the season, as the saying goes, is gravy - costing me nothing but my time and energy (which I really don't mind spending sitting around a campfire with the kids).

While I'm by no means an expert, I have learned a few things in the last few weeks. Most of these pertain directly to the Simple and Inexpensive three-pan boiling system I've been using, but some are fairly universal.

1) Maple syrup season comes just as the snow is leaving, which means the ground will be very cold and very muddy. I like to use kleenexes, newspaper, junk mail, and other "burnable" trash to start my fires (making use of it instead of sending it to the landfill - another plus for this method), but these all tend to wick up water and then not light up. To get around this, I've found it helpful to make a base of small branches under where I'm starting my campfire. This lifts my paper and other firestarting materials off of the cold, wet ground and keeps them dry.

2) Another trial-and-error tip I've learned is that it's helpful to take the time to make sure your setup is level before you start your fire and add your sap. If your pans are tipped, you can't boil as much sap in each pan, which makes the whole process take that much longer.
Catywampus pans - see how one side is full, but the other side has hardly any sap?
3) As I mentioned in tip #1, maple syrup season comes in the early spring, when there is still a good chance of wintry weather. In the middle of my last sap boiling afternoon, the weather suddenly turned and it started snowing. Of course, the last thing you want is more water in your sap! So I pulled out the canopy we'd used for the farmer's market last summer, which worked like a charm (but now smells very strongly of campfire smoke!)
Oh, no! Snow! Time for Sap Camp!
4) After 16+ hours over an open fire, my boiling pans are now very black and sooty. Instead of trying to get all of that grime off of the outside of the pan (I do scrub out the inside, of course), I simply slip the entire pan - once it's cooled off - into a plastic garbage bag. That way they don't make a mess of wherever I store them until the next batch of sap is ready. Each pan gets its own bag, and then I nest the bagged up pans together for storage.

5) It's helpful to have one pot for transferring the sap from the boiling pans into the kitchen, then another ready to filter the sap into for finishing on the stove. You want to be able to preserve as much heat as possible during this transfer to save time and energy boiling off the last of the excess water, so it's best to think ahead and have things ready so you can move quickly.

6) Since you need to make sure your sap gets to exactly 7 degrees above boiling, it's very important to have an accurate thermometer. Unfortunately, I don't seem to have one (the new digital one I bought shorts out from the steam, apparently, and shuts off before it gets up to the final temperature), so I've been depending on the "sheeting" test (which is fine in my situation, since I'm only making syrup for my own family, not selling any).

7) A useful tip I learned at Sam Thayer's class was that you can sterilize your jars of syrup (similar to canning) by inverting them for 4 seconds, as long as your syrup is above 180 degrees. So if you put your syrup in jars right away after boiling, they should be plenty hot (217 degrees here in northwestern Wisconsin). Make sure all surfaces have been touched by the hot syrup so no bacteria remain alive, and your syrup should stay sterile until the jar is opened.

I'm sure there are many more things I'll learn as I go, but hopefully these will save you some time and headaches as you get started.

Those of you who've made maple syrup before - do you have any tips for me?

(You can read more of my maple syrup adventures here, here, and here)


Please note - the links above are affiliate links. If you make a purchase after clicking I will receive a small commission, but your price remains the same. Thank you for your support!

Monday, April 1, 2019

Seed Starting Part 2

starting plants from seed
It's beginning to look a little more like spring outside (the snow is down to just patches in the yard instead of multiple feet deep everywhere) so I didn't feel quite so crazy starting my second batch of seeds today. It's amazing what a difference a few weeks can make! My last batch of seeds are up and beautifully green (although the Brussels Sprouts in particular are getting pretty leggy - anyone have any tips to help with that? I have two grow lights over each tray, and I try to run my hands over them every few days to toughen them up, but it doesn't seem to be enough. I would appreciate any tips you might have!)
I'm really loving the soil blocks - I didn't need to water at all while the seeds were under the clear plastic "greenhouse" dome, and I've only watered once or twice since (don't worry, I check them daily, and they've never dried out). I did have to move the parsley blocks into a smaller greenhouse tray because they take so much longer to germinate (I hadn't thought that through when I started), and they held together wonderfully, both when I took them out and when I moved them back. I am amazed that it's been a full month and they're still holding their shape, even after light watering and being moved around twice, without any paper pot or net or anything.

So I was very confident this afternoon starting my second batch of seeds. The plan was to start my tomatoes, peppers, spinach, lettuce, and rutebagas (I've never grown those before - any tips on those? I'm guessing they're pretty similar to other brassiccas?) I've noticed that I have a bit of a compulsion about buying seeds - and I also have trouble throwing them out if I have partial packages from previous years - so I had multiple packages of tomatoes (and multiple varieties, as well!) dating back to at least 2014 (some of them you couldn't even read the date on anymore . . .) I did manage to finish off one package today (although somehow it was the newest package. *sigh*)

In case you're curious, here's what I planted (I should confess - this is more for my benefit than for yours, to help me remember how many of what seed I planted, and where it is on the tray!)
On the far left, I planted three blocks of Seeds of Change "San Marzano" tomatoes (those were the ones I ran out of - and of course those were the ones I wanted to plant the most!) I filled out my main tomato crop with twelve Seed Savers Exchange "Brandywine" tomatoes (my absolute favorite for flavor, but I had a lot of blossom end rot in that variety last year), and just for fun I'm starting two blocks of cherry tomatoes (which I read somewhere actually have the best nutritional profile of all of the different kinds of tomatoes - so maybe I should plant more of those). Next I put in a row of four jalapenos (I don't have high hopes there - those were the seeds from 2014, and they were from a 50 cent packet I picked up at the grocery store on a whim). Then I put in five Seed Savers Exchange "Joan" Rutebagas along the bottom edge (I'm really excited to try those). And finally I filled in the box with a dozen spinach seeds ("Bloomsdale Longstanding" - my old standby), four "Red Velvet" lettuce, and four "Buttercrunch" lettuce.

It's hard to believe that my next garden task (in just two weeks!) will be planting peas, lettuce, spinach, and onion sets out in the garden. It seems impossible that my currently snow-covered garden will be warm, dry, and ready to plant in just two weeks, but it happens every year - and the progress that's been made in the last two weeks gives me reason to hope!

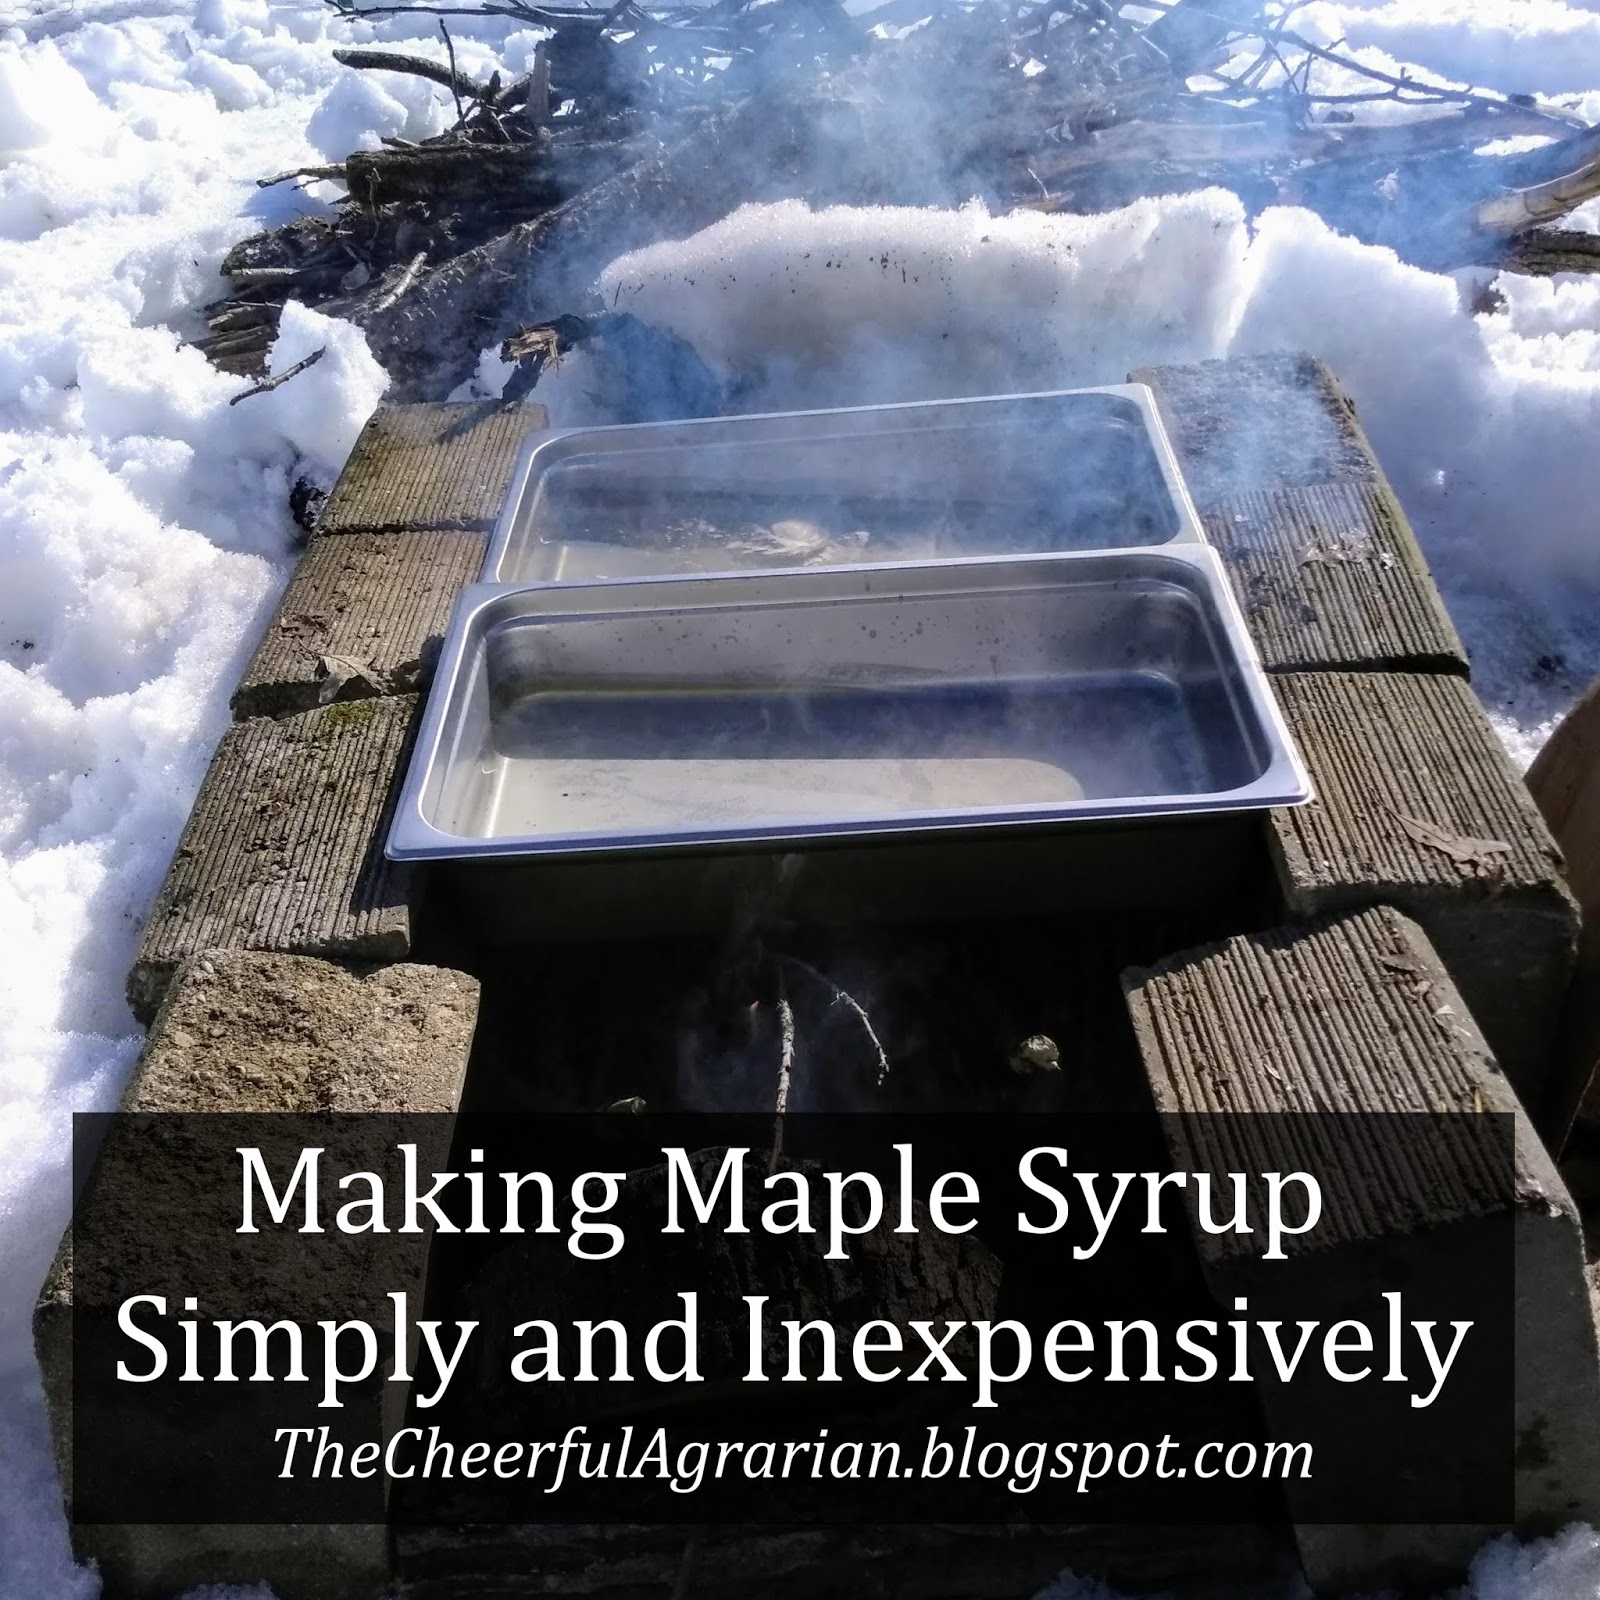
Making Maple Syrup Simply and Inexpensively

backyard small scale maple syrup
If you go to Leader Evaporator (one of the main maple syrup suppliers in the United States), you'd be tempted to feel like you need to be independently wealthy to afford to make your own syrup. The smallest evaporator they sell ("Ideal for the backyard sugar maker with just 15 to 50 taps") costs $1,370. For me, not being independently wealthy (unfortunately this blog hasn't brought me the fame and fortune certain articles on Pinterest would lead me to expect 😉) and with only a couple dozen maple trees big enough to tap on our property, there's no way a setup like that was going to be worth it for us.

Thankfully, I have friends and family who've made maple syrup on a small scale (here's my sister-in-law, Mama Hen's, blog post about their first time making syrup), so I knew it was possible without breaking the bank. It still seemed a little overwhelming, though, which is why I went to Sam Thayer's class at Forager's Harvest (you can see my post about that here). During his presentation, he showed us a super simple setup for trying out making syrup. The basic idea is to set up two lines of cement blocks, build a fire between them, and then support three buffet service pans on the blocks. You fill the pans about one inch deep with sap and let them boil down, moving the more-finished sap into one pan, the fresh sap into the pan on the other end, and the half-done sap in the middle pan.

Since I already had some retaining wall blocks on the property (gotta love obtanium!), I didn't have to buy those, so my whole setup, including taps, bag holders, bags, and pans, cost me $150 (which I figured is about what three gallons of maple syrup would cost to buy locally). This method is a lot more time-intensive than using a professional quality evaporator would be, but as I said in a previous post, it's time doing something I'd enjoy doing anyway. When it gets to the point that it's taking too much time, or taking time from other things I'd like to do, then I'll have to decide if I want to buy equipment to make the process more streamlined, or stop making syrup myself and go back to buying from my friends and family. But for now, just trying it out on a hobby level, this is a great way to do it.

So what are the bare minimum things you need to make maple syrup? Of course you'll need some kind of taps for your trees (this is the kind I bought, although I'd prefer stainless steel if I could find them). You'll also need a drill bit of the same size as your taps (it's recommended to buy one especially for tapping, since you're making food (so you don't want to use a rusty old bit, used for who-knows-what, out of the bottom of your tool bag), and you want it as sharp as possible to minimize damage to your trees). I also like to sanitize my bit between trees, just to make sure I don't transfer diseases from tree to tree, so I dip the drill bit in a jar of rubbing alcohol after I finish drilling each tap hole.
You'll also need something to collect the dripping sap in. The cheapest I've found is to take an old (very clean) milk jug, vinegar bottle, or plastic coffee container, punch a hole in the side, and hang that from your tap. Or you can buy metal hangers and blue plastic bags, which is pretty standard. Friends of ours use something similar to this setup with a short length of PVC pipe, which cuts cost (the metal hangers cost about $4 a piece locally; the bags themselves only cost about 30 cents if you buy them in bulk). I bought 10 of the metal hangers and blue plastic bags to start; when I tapped additional trees I just used milk jugs. To be honest, I think I prefer the milk jugs because the sap inside stays cleaner - since they have a closed cap, they get far fewer bugs, twigs, and bits of tree bark in them. If I were starting over again, I would have saved the $40 on bag hangers and just used milk jugs to begin with.

Then you'll need something to gather the sap from your collection containers; I use a food safe 5 gallon bucket I've had for a while (I think it was originally for a bucket of pickles we had at church - I made sure the smell had dissipated before I used it for syrup!) I usually wait to boil until I have at least 5 gallons of sap; if I don't have enough, I'll store it in my spare refrigerator in ice cream buckets or gallon-sized glass jars. Since sap is basically sugar water, it goes bad very quickly (it can spoil in around a day at room temperature), so if you can't boil right away you'll need to refrigerate or freeze it. If you're working with small enough quantities, this can be workable, but obviously if you're getting more than 5 gallons a day storage can become a major issue, and you will need to cook your sap more often.

When you're ready to boil down the sap, you want to find a pot with as much surface area as possible, so it can boil off as quickly as possible. These buffet pans work great, but a large stock pot or enameled canning kettle would work well, too (and be useful for other applications as well - although after being over the fire they do get pretty thoroughly blackened).

When you've boiled most of the water away, you can bring the remaining almost-syrup into the kitchen to be finished off in a regular soup kettle. Technically you could finish your syrup over the fire, but getting your syrup to the right final temperature can be tricky, and finishing in the kitchen gives you more control. I like to strain my syrup at this point; it's much easier to strain before it's in its final thick syrup state, and you will get ashes in your pans when you cook over an open fire. I strain my sap through a piece of cloth set into a fine metal strainer (a flour sack type towel would work fine - make sure you get it damp first or it may just hold the sap without letting it strain through - guess how I know this?😉) This works well enough for syrup you're going to consume yourself and you're not planning to sell.

When I first tried this method, I was worried that the syrup would end up tasting smoky from the long boil over the open fire. Much to my relief, my finished syrup tasted just like any other maple syrup I've ever bought. Definitely make sure you filter after you bring it into the house to get the ashes out, though.

You'll want to make sure you have an accurate thermometer. For small home batches, you can test your syrup by bringing it up to 7.1 degrees higher than the boiling point of water (which can vary by elevation - around here that works out to 217.1 degrees Fahrenheit). At this point, it should sheet off of the back of a spoon, similar to when you test jelly.

And you're done! All that's left is bottling it up - I just use quart size canning jars for ours, but you can use any container you like.
As you can see, if you're just starting out and only tapping a few trees, there's really not much you have to buy - you can make do with many of the things you already have in your kitchen. There are definitely things that will make things go faster or more smoothly, but if you're just testing the water and this is something you're not sure you want to spend a lot of money on, there are definitely ways to do it inexpensively!


You can read more about my maple syrup adventures here, here, and here.

Friday, March 29, 2019

Pudgie Pie "Recipes"

pudgie pie hobo pie recipes
In my previous post, I mentioned that while we're boiling down the sap to make maple syrup we like to use the fire to make pudgie pies, too. My friend Carla asked me to share my pudgie pie recipe - which made me laugh, since we don't really use a recipe; we simply think, "Would this be good toasted between two pieces of bread?" and if the answer is yes, we try it!

What is a pudgie pie, you ask? It's also sometimes called a Hobo Pie, and it's basically a sandwich toasted over a campfire using a special iron (click here or see the link below). I recommend using the cast iron version rather than the aluminum kind (I don't use aluminum for food preparation in general, and I also feel that the cast iron heats more evenly).

To make a pudgie pie, you butter two pieces of bread and place them into the iron - butter side out, touching the cooker. Then you fill the sandwich with your filling of choice - either sweet or savory - close the cooker, and set it into your campfire to cook (a nice hot bed of coals works best). It's done when you say it's done - a light golden brown or almost black, everyone has their own personal preference, just like roasting a marshmallow or making toast. As long as your ingredients are pre-cooked, it doesn't really matter.

Our favorite savory pudgie pies are hot ham and cheese. Think paninis - it's basically the same idea. My husband likes to make his with turkey, cheese, avocado slices, and crushed garlic (he really likes his garlic!) Another favorite is Pizza Pudgies - pizza sauce and mozzarella, with your choice of fillings: pepperoni, mushroom, black olive, green pepper, etc.

But of course the best pudgie pies are the dessert pies. Growing up, we always had pudgies with canned pie filling (cherry is my favorite!) It wasn't until I was married that I tried other options, like PBJ (if you haven't had melted peanut butter and jelly, you haven't lived!), peanut butter and chocolate (think a melted peanut butter cup), or my all-time personal favorite: dark chocolate covered cherry.

The possibilities are endless, and kids love the chance to make their own special sandwich, just for them. When cooking with kids, however, be careful; the irons get very hot! It's helpful to have a heat-proof table nearby to set your irons on when filling and emptying them (plastic folding tables are NOT good for this - mine now has a permanent pudgie pie iron mark melted into the top!)

To serve your pie, simply pull the handles apart so that the pie is on one side and the other is empty, then flip it out onto a plate. If you added enough butter at the beginning, it should fall out easily. This part can be tricky for kids with shorter arms, so it's best for adults to work with the hot irons after they've been taken out of the fire.

So as you can see, pudgie pies can be a super simple, family-friendly meal, or just a special treat around the campfire. They've always been a camping tradition in our family, and I have a feeling it's one my kids will be passing on to their children someday, too.

How about you? What are your favorite pudgie pie "recipes"?


Please note - the links above are affiliate links. If you make a purchase after clicking I will receive a small commission, but your price remains the same. Thank you for your support!

How Much Can You Get From a Batch of Home-Made Maple Syrup?

backyard maple syrup tips
I think I found the perfect job! For one month of the year, I get to sit around and poke sticks into a campfire every other afternoon. At the end of the month, I'll have (hopefully) a few gallons of maple syrup to show for all my "hard work". Sweet reward for something most of us do for relaxation! Of course, as my husband likes to point out, my per hour monetary compensation isn't even up to minimum wage (one pint of syrup goes for around $6 in our neck of the woods, and that's what I usually get for a four-hour stint at the campfire boiling down a five gallon bucket of sap), but since I don't really consider it working, I don't really care!

But my syrup output isn't the only reward for my "labor". I'm also counting this against a hypothetical gym membership, since I got plenty of exercise last fall gathering fallen sticks from the woods (squats, stretches, knee bends! And resistance walking pulling the sled full of sticks down to the garden!)

That's not all - I also decided that I'd burn the wood over a future garden bed. This will not only kill some grass (saving money on mulch!) but will also add wood ash and biochar, improving the nutrient profile in that garden bed, which will hopefully result in higher yields of more nutrient-dense vegetables this summer - saving money on fertilizer, food costs, and health care!

One more thing - just for fun, we made pudgie pies for supper over the fire (would that count for saving propane because I didn't cook in the house, or as a recreational expense, because we didn't have to rent a campsite?)

So even though my fiscal bottom line may not be up to the government's minimum wage, in my mind the time spent was well worth it. And home-made maple syrup really is a sweet reward!

(You can read more about my maple syrup adventures here, here, and here.)