Showing posts with label Obtanium. Show all posts

Friday, April 5, 2019

Maple Syrup Making Tips

backyard maple syrup tips
Today we boiled down our fourth batch of maple syrup, bringing our finished syrup total over three gallons - which means we've officially "paid off" my investment (meaning I've produced enough syrup, in terms of dollars, to offset the money I paid for the equipment. So the rest of the season, as the saying goes, is gravy - costing me nothing but my time and energy (which I really don't mind spending sitting around a campfire with the kids).

While I'm by no means an expert, I have learned a few things in the last few weeks. Most of these pertain directly to the Simple and Inexpensive three-pan boiling system I've been using, but some are fairly universal.

1) Maple syrup season comes just as the snow is leaving, which means the ground will be very cold and very muddy. I like to use kleenexes, newspaper, junk mail, and other "burnable" trash to start my fires (making use of it instead of sending it to the landfill - another plus for this method), but these all tend to wick up water and then not light up. To get around this, I've found it helpful to make a base of small branches under where I'm starting my campfire. This lifts my paper and other firestarting materials off of the cold, wet ground and keeps them dry.

2) Another trial-and-error tip I've learned is that it's helpful to take the time to make sure your setup is level before you start your fire and add your sap. If your pans are tipped, you can't boil as much sap in each pan, which makes the whole process take that much longer.
Catywampus pans - see how one side is full, but the other side has hardly any sap?
3) As I mentioned in tip #1, maple syrup season comes in the early spring, when there is still a good chance of wintry weather. In the middle of my last sap boiling afternoon, the weather suddenly turned and it started snowing. Of course, the last thing you want is more water in your sap! So I pulled out the canopy we'd used for the farmer's market last summer, which worked like a charm (but now smells very strongly of campfire smoke!)
Oh, no! Snow! Time for Sap Camp!
4) After 16+ hours over an open fire, my boiling pans are now very black and sooty. Instead of trying to get all of that grime off of the outside of the pan (I do scrub out the inside, of course), I simply slip the entire pan - once it's cooled off - into a plastic garbage bag. That way they don't make a mess of wherever I store them until the next batch of sap is ready. Each pan gets its own bag, and then I nest the bagged up pans together for storage.

5) It's helpful to have one pot for transferring the sap from the boiling pans into the kitchen, then another ready to filter the sap into for finishing on the stove. You want to be able to preserve as much heat as possible during this transfer to save time and energy boiling off the last of the excess water, so it's best to think ahead and have things ready so you can move quickly.

6) Since you need to make sure your sap gets to exactly 7 degrees above boiling, it's very important to have an accurate thermometer. Unfortunately, I don't seem to have one (the new digital one I bought shorts out from the steam, apparently, and shuts off before it gets up to the final temperature), so I've been depending on the "sheeting" test (which is fine in my situation, since I'm only making syrup for my own family, not selling any).

7) A useful tip I learned at Sam Thayer's class was that you can sterilize your jars of syrup (similar to canning) by inverting them for 4 seconds, as long as your syrup is above 180 degrees. So if you put your syrup in jars right away after boiling, they should be plenty hot (217 degrees here in northwestern Wisconsin). Make sure all surfaces have been touched by the hot syrup so no bacteria remain alive, and your syrup should stay sterile until the jar is opened.

I'm sure there are many more things I'll learn as I go, but hopefully these will save you some time and headaches as you get started.

Those of you who've made maple syrup before - do you have any tips for me?

(You can read more of my maple syrup adventures here, here, and here)


Please note - the links above are affiliate links. If you make a purchase after clicking I will receive a small commission, but your price remains the same. Thank you for your support!

Monday, April 1, 2019

Making Maple Syrup Simply and Inexpensively

backyard small scale maple syrup
If you go to Leader Evaporator (one of the main maple syrup suppliers in the United States), you'd be tempted to feel like you need to be independently wealthy to afford to make your own syrup. The smallest evaporator they sell ("Ideal for the backyard sugar maker with just 15 to 50 taps") costs $1,370. For me, not being independently wealthy (unfortunately this blog hasn't brought me the fame and fortune certain articles on Pinterest would lead me to expect 😉) and with only a couple dozen maple trees big enough to tap on our property, there's no way a setup like that was going to be worth it for us.

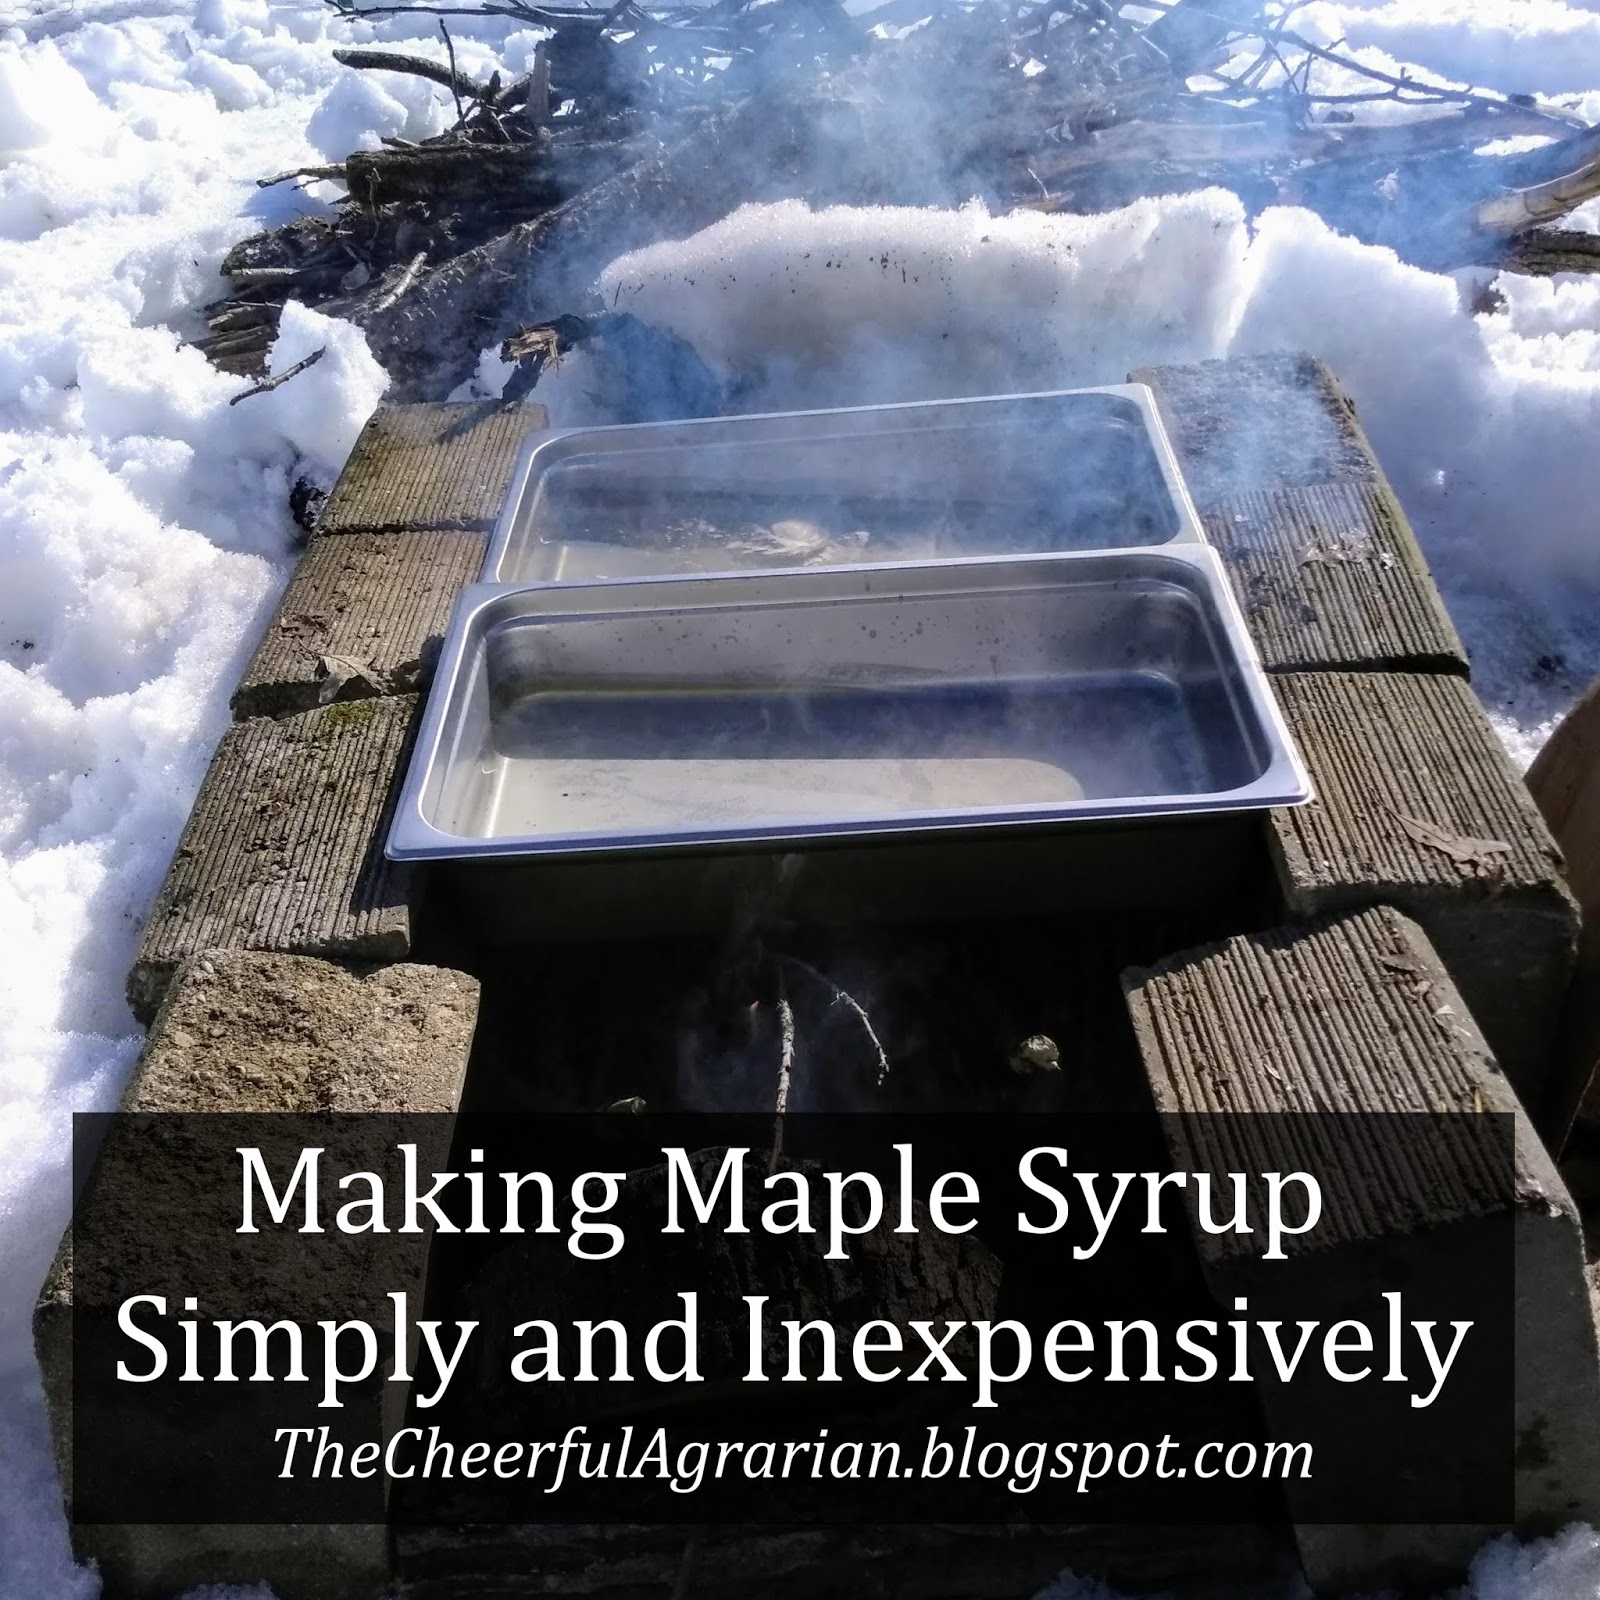
Thankfully, I have friends and family who've made maple syrup on a small scale (here's my sister-in-law, Mama Hen's, blog post about their first time making syrup), so I knew it was possible without breaking the bank. It still seemed a little overwhelming, though, which is why I went to Sam Thayer's class at Forager's Harvest (you can see my post about that here). During his presentation, he showed us a super simple setup for trying out making syrup. The basic idea is to set up two lines of cement blocks, build a fire between them, and then support three buffet service pans on the blocks. You fill the pans about one inch deep with sap and let them boil down, moving the more-finished sap into one pan, the fresh sap into the pan on the other end, and the half-done sap in the middle pan.

Since I already had some retaining wall blocks on the property (gotta love obtanium!), I didn't have to buy those, so my whole setup, including taps, bag holders, bags, and pans, cost me $150 (which I figured is about what three gallons of maple syrup would cost to buy locally). This method is a lot more time-intensive than using a professional quality evaporator would be, but as I said in a previous post, it's time doing something I'd enjoy doing anyway. When it gets to the point that it's taking too much time, or taking time from other things I'd like to do, then I'll have to decide if I want to buy equipment to make the process more streamlined, or stop making syrup myself and go back to buying from my friends and family. But for now, just trying it out on a hobby level, this is a great way to do it.

So what are the bare minimum things you need to make maple syrup? Of course you'll need some kind of taps for your trees (this is the kind I bought, although I'd prefer stainless steel if I could find them). You'll also need a drill bit of the same size as your taps (it's recommended to buy one especially for tapping, since you're making food (so you don't want to use a rusty old bit, used for who-knows-what, out of the bottom of your tool bag), and you want it as sharp as possible to minimize damage to your trees). I also like to sanitize my bit between trees, just to make sure I don't transfer diseases from tree to tree, so I dip the drill bit in a jar of rubbing alcohol after I finish drilling each tap hole.
You'll also need something to collect the dripping sap in. The cheapest I've found is to take an old (very clean) milk jug, vinegar bottle, or plastic coffee container, punch a hole in the side, and hang that from your tap. Or you can buy metal hangers and blue plastic bags, which is pretty standard. Friends of ours use something similar to this setup with a short length of PVC pipe, which cuts cost (the metal hangers cost about $4 a piece locally; the bags themselves only cost about 30 cents if you buy them in bulk). I bought 10 of the metal hangers and blue plastic bags to start; when I tapped additional trees I just used milk jugs. To be honest, I think I prefer the milk jugs because the sap inside stays cleaner - since they have a closed cap, they get far fewer bugs, twigs, and bits of tree bark in them. If I were starting over again, I would have saved the $40 on bag hangers and just used milk jugs to begin with.

Then you'll need something to gather the sap from your collection containers; I use a food safe 5 gallon bucket I've had for a while (I think it was originally for a bucket of pickles we had at church - I made sure the smell had dissipated before I used it for syrup!) I usually wait to boil until I have at least 5 gallons of sap; if I don't have enough, I'll store it in my spare refrigerator in ice cream buckets or gallon-sized glass jars. Since sap is basically sugar water, it goes bad very quickly (it can spoil in around a day at room temperature), so if you can't boil right away you'll need to refrigerate or freeze it. If you're working with small enough quantities, this can be workable, but obviously if you're getting more than 5 gallons a day storage can become a major issue, and you will need to cook your sap more often.

When you're ready to boil down the sap, you want to find a pot with as much surface area as possible, so it can boil off as quickly as possible. These buffet pans work great, but a large stock pot or enameled canning kettle would work well, too (and be useful for other applications as well - although after being over the fire they do get pretty thoroughly blackened).

When you've boiled most of the water away, you can bring the remaining almost-syrup into the kitchen to be finished off in a regular soup kettle. Technically you could finish your syrup over the fire, but getting your syrup to the right final temperature can be tricky, and finishing in the kitchen gives you more control. I like to strain my syrup at this point; it's much easier to strain before it's in its final thick syrup state, and you will get ashes in your pans when you cook over an open fire. I strain my sap through a piece of cloth set into a fine metal strainer (a flour sack type towel would work fine - make sure you get it damp first or it may just hold the sap without letting it strain through - guess how I know this?😉) This works well enough for syrup you're going to consume yourself and you're not planning to sell.

When I first tried this method, I was worried that the syrup would end up tasting smoky from the long boil over the open fire. Much to my relief, my finished syrup tasted just like any other maple syrup I've ever bought. Definitely make sure you filter after you bring it into the house to get the ashes out, though.

You'll want to make sure you have an accurate thermometer. For small home batches, you can test your syrup by bringing it up to 7.1 degrees higher than the boiling point of water (which can vary by elevation - around here that works out to 217.1 degrees Fahrenheit). At this point, it should sheet off of the back of a spoon, similar to when you test jelly.

And you're done! All that's left is bottling it up - I just use quart size canning jars for ours, but you can use any container you like.
As you can see, if you're just starting out and only tapping a few trees, there's really not much you have to buy - you can make do with many of the things you already have in your kitchen. There are definitely things that will make things go faster or more smoothly, but if you're just testing the water and this is something you're not sure you want to spend a lot of money on, there are definitely ways to do it inexpensively!


You can read more about my maple syrup adventures here, here, and here.

Friday, February 22, 2019

Stretch Your Dog Food Dollar with Homestead Scraps

dog food homestead recycling upcycling scraps
As a homesteader, I try to be very careful about counting the cost vs. benefit of all of the animals on our property. Each needs to fulfill a role (or our freezer), at the least possible expense.

So when I was walking through our local Farm & Fleet store the other day looking at dog food, I began to reconsider the worth of our pug/dachshund cross. Is she really worth $30 for a 40 pound bag of Iams? I won't even pay that much for chicken feed - and last I checked, our dog hasn't laid any eggs lately!

My daughter, of course, thinks she's worth every penny; and she does serve as a pretty effective doorbell (a loud, high-pitched, hey-that-scary-car-is-still-parked-in-that-same-spot-it's-been-all-weekend-oh-wait-that's-yours kind of doorbell, but still . . .), small rodent deterrent, spill licker, daughter's-bed-warmer, and general source of amusement. She also sings along with the Hallelujah Chorus, so there's that.

Which means she's staying; but it would be nice if we could somehow make her food a little cheaper. So I started researching dog food recipes.

The first thing I noticed was that most of the recipes I could find were NOT cheaper. Chicken breast, rice, special vitamin supplements - this was definitely not going to save me any money. But every so often I'd find ingredients that got me thinking: Liver - I have plenty of chicken livers from butchering our birds, and even though I still haven't found a pate recipe that anyone but me will eat, I can't just throw them away! Eggs - Wisconsin winters mean cracked, frozen eggs, which I don't let my kids eat, but the dog could; Squash - the garden always gives us more squash than we can handle; Apples - how about that experiment where I turned the leftover apple smash from our cider making into applesauce, but it didn't really taste so good? It turns out, there are a lot of things that would make good dog food going to waste in our house.

So I developed a basic recipe, built off of otherwise wasted foods on our homestead:
1/2 cup squash or carrots
1/2 cup meat (chicken hearts, meat from soup bones, etc.)
 - or - 1 egg (with shell; the added calcium is good for them, but smash it well so they don't cut themselves)
1/4 cup livers
1/4 c green vegetables (green beans, etc.)
1 Tbsp fat (lard, chicken fat, etc.)

This is only a base; we substitute, add, or leave things out all the time. I regularly add bone broth - it's mostly water, after all, so it's cheap, and it's a great source of collagen to help our old dog's aging joints. In the winter, when the pigs are tucked away at freezer camp, the dog gets most of the whey from my cheesemaking, too.

Now, I know what you're thinking - this isn't perfectly vitamin and mineral balanced like the stuff in the bags! There's no veterinary nutritionist overseeing this! But hold on a minute. Look at your diet - do you eat the same nutritionally balanced pellet every day? Or do you prefer a varied diet of healthy foods? And no one is saying this has to be your dog's only food - in our family, we mix a homemade "stew" for our dog's supper, but still give her kibble for breakfast - partially for "nutrient insurance" and partially just because we're lazy. 😉

And if you are lazy like us, you can actually make up a big batch all at once in the fall (or whenever) and freeze or pressure can it. A rule of thumb for canning is that your time and pressure need to be what's required for the ingredient that needs the most - usually the meat ingredient (you can check the canning times for most foods in the Ball Blue Book of Canning and Preserving). That way, you just have to pop open a jar when your dog's meal time comes around, rather than cooking a separate meal for her every day. And if a whole jar is too much for your small dog, you can refrigerate the extra and she can have leftovers the next day (just like your kids!)

So I've found that the key to saving money feeding your dog can be looking at the healthy food you're already raising for your family and seeing what's being wasted. Just like we save our kitchen scraps to supplement our chickens' ration and minimize their feed bill, think about what would otherwise go unused that would make healthy and delicious dog food. And remember, this is an animal that eats chicken poop like it's candy - what seems gross to you might be a gourmet delight to her!


Please note - the links above are affiliate links. If you make a purchase after clicking I will receive a small commission, but your price remains the same. Thank you for your support!

Wednesday, February 20, 2019

"Unpaper" Towels - or, as Grandma used to call them, "Rags"

recycling upcycling green living
It seems all the rage in homesteading blogs lately to post how-to articles about "Reusable Paper Towels" (aka "Unpaper" Towels).
(Don't believe me? Just go on Pinterest and type in "Reusable Paper Towels". See, Mom, these really are a thing!)

Instructions come complete with sewing directions and materials list - presumably you need to go out and buy all new, pretty fabrics - one kind for the front and another for the back. When I see these, I just laugh. I remember my post from back in 2011 about "Pancake Powered Kitchen Appliances", and the revelation that all of these new-fangled, factory produced "necessities" of our lives generally are just cheap (or sometimes not so cheap!) imitations of recipes or tools housewives have made and used for years. Paper towels are no exception. How did our grandmothers clean up spills before the invention of those handy, tear-off, disposable paper towels? (*gasp!*)

They used rags.

That's right - old, used-up, so-worn-out-they-can't-even-be-patched clothing was cut up and given one last use (or maybe more - if they're not too gross, you can wash them and re-use them indefinitely) before heading to the trash can.

A friend once bemoaned the fact that there was no use for her children's holey socks. I laughed and told her I always cut them in half and use them for rags (after washing them, of course). If you have toddlers making holey socks, I'm guessing you also have toddlers making messes that need wiping up!

That old t-shirt? You can get lots of rags out of that! Cut it up, and you have the perfect clean-up tool for when the dog drools all over the floor next to his water bowl. Or one of my favorites - spritz them with a little water mixed with liquid castile soap (here's the kind I make) and use them for baby wipes! Much more gentle for baby's sensitive skin than those who-knows-what-chemical doused paper ones (have you noticed that the "fancy" wipes claim to have a "cloth-like feel"? Why not just use cloth?)

Grossed out by re-using hankies? Blow your nose in an old scrap of sweatshirt, and feel no guilt about throwing it away!

My husband even claims his old T-shirts for use in the garage (do you know automotive stores sell boxes of "shop rags" (click here to see them on Amazon if you don't believe me!) - brand new, perfectly unused pieces of cloth! For rags! Grandma would be appalled!)

So instead of paying good money for something you're just going to throw away (don't even get me started on trash bags!!!), save your hard-earned dollars and give those old worn-out clothes one last good use before you say goodbye.

Monday, June 4, 2018

A New Adventure


It’s been a while, dear reader (to put it mildly), and so much has happened since my last post! One of the biggest changes is that we’ve moved to a new house. We left our old manufactured home on just under 8 acres and purchased a full-log home with 22 acres - half wooded, half pasture. The kids are loving the woods to roam in, my husband is enjoying the verdant views and wildlife (we've seen whitetailed deer, turkeys, hawks and bald eagles, bear tracks; we've heard barred owls hooting in the night; and a pair of phoebe birds are building a nest above our porch), and I’m having fun trying new things in the house and garden. I’m also enjoying the rich deposits of Obtanium we have in the woods on the property (“Obtanium” is a word I learned from a teacher at the Hay River Traditional and Green Skills Event a year or two ago – the definition being, roughly: “that which is found, gathered, or bartered for - not purchased - and put to good use”. See also “Redneck Recycling”). The fallen leaves, old dead wood, and abundant rocks have all found uses in the gardens - and the morel mushrooms my daughter discovered were a welcome addition in the kitchen!

We moved in mid-February, for which I am heartily grateful. It was a challenge on our actual moving day (I remember temps of -17F as friends helped us transfer furniture from the old house to the new), but after the heavy lifting was accomplished, it was nice to have time to set up the house while the yard waited patiently under a foot or so of snow. We had a late winter (on April 16th I posted a shot on Facebook of the hill outside the kitchen door where I was planning to put the garden – the yardstick measured a 16-inch snowbank there!) and the snow stuck around until the end of April.

I was very blessed to have a friend who was willing to keep my hens for me during the transition. It’s not many women who will add a friend’s 18 chickens to a coop that previously only held her 7 birds! Obviously, this created a major egg surplus compared to what she was used to, and even supplying us, she was able to have a little fun selling eggs on the side (she bought a dozen or so more chicks this spring, so I think it’s safe to say she liked the experience!)

We finally brought the hens to the new property in May, thanks to another friend who offered us her old coop – which is actually an old pickup-bed camper converted for the job. It works great, and I certainly couldn’t complain about the price (free)!
Gotta love that Obtanium!

We also picked up our new pair of feeder pigs just this Friday: Maple (the brown girl) and Hickory (the black male). This year’s names reflect my hope that I’ll be able to try my hand at smoking our own bacon this fall (I took a class on home smoking at the event I mentioned above, and I can't wait to try it out!)

Little by little, our new farm is taking shape!